Top 5 Proxy Software for PC
Setting up a proxy in Proxifier
Proxy settings in Proxy Switcher
Proxy settings in ProxyCap
Proxy settings in CCProxy
Proxy settings in FreeCap
What program to choose to configure the proxy
Proxifiers, also known as proxying programs, are tools designed to modify the network connection settings of a device, redirecting network traffic through a proxy server. These tools serve various purposes related to anonymity and network connection management. Here are some of the main reasons for using proxifiers:
- Hide the real IP address.
- Bypass geolocation restrictions or content blocking.
- Allowing to manage traffic by directing it through special filters and rules.
- Used to cache web pages and other content, speeding up access to resources.
- Enhanced security
Setting up a proxy in Proxifier
Proxifier is an advanced program designed for setting up proxy servers. It offers a unique capability to connect proxies to network applications that do not inherently support this feature. Proxifier allows for the management of HTTP, HTTPS, and SOCKS servers, enabling users to create customized rules for their operation. This application is highly valuable for professionals working with the Internet and also caters to curious users seeking confidential web browsing. The software enables the establishment of complete anonymous connections within corporate networks. Users have the flexibility to configure proxy server activation for all network connections or specific websites. Additionally, the program supports the utilization of proxy chains. To obtain the application, you can download the Windows or MacOS version from the developer's official website. You have the opportunity to try out the program's features free of charge for a duration of 31 days. Subsequently, to continue using it, a license must be purchased at the price of $39.95.
How to use Proxifier
The question of how to use Proxifier is a common concern among many users. Despite its extensive interface, utilizing the program is actually quite straightforward, and we will provide a step-by-step guide on how to do so below.
Proxifier setting
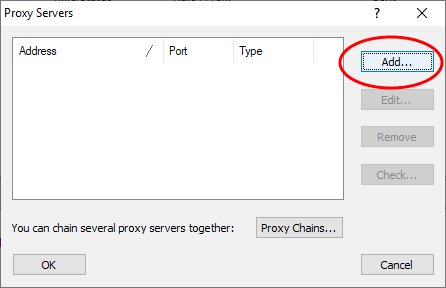
- Begin by opening the "Profile" section. From the dropdown menu that appears, select "Proxy Servers".
- In the automatically opened window, click on the "Add" button.
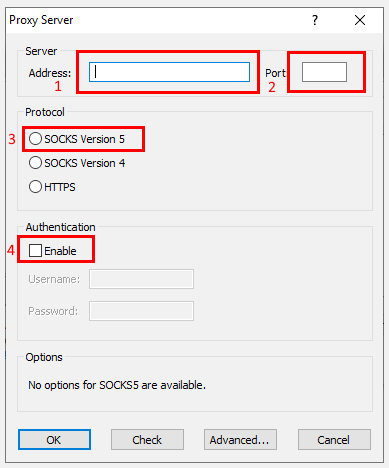
- Enter the proxy IP address along with the server port. Choose the desired type of proxy server by checking the appropriate box (SOCKS5, SOCKS4, or HTTP/S). If you are using an individual (private) proxy server with login and password authentication, enable the "Authorization" option by checking the corresponding box next to the "Enable" value. Then, enter your credentials in the designated fields. If the server is public, you can skip this step.
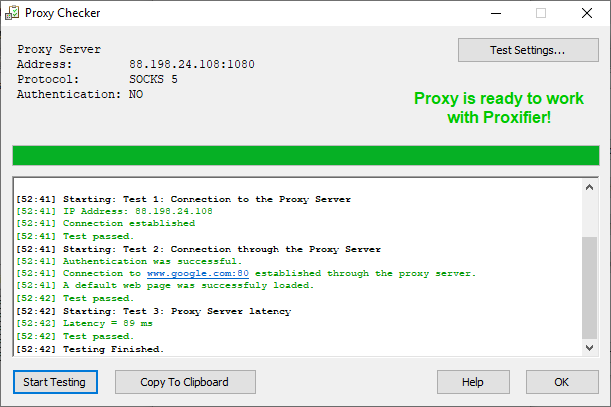
- Initiate the process of checking the proxy server by clicking on the "Check" button.
- If the proxy server is functioning properly, you will see the message "Proxy is ready to work with Proxifier".
- Upon adding a proxy to Proxifier for the first time, a window will appear asking if you want to use this server as the default for all applications. To configure all applications to use this proxy, click "Yes".


Proxifier rules configuration
To make exceptions or create rules in Proxifier, follow these simple steps:
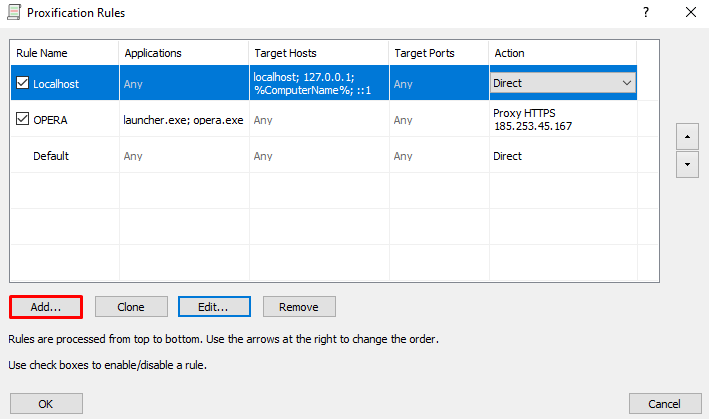
- Click on the rule creation icon located beneath the main menu.
- In the window that opens, add new rules by clicking the "Add" button.
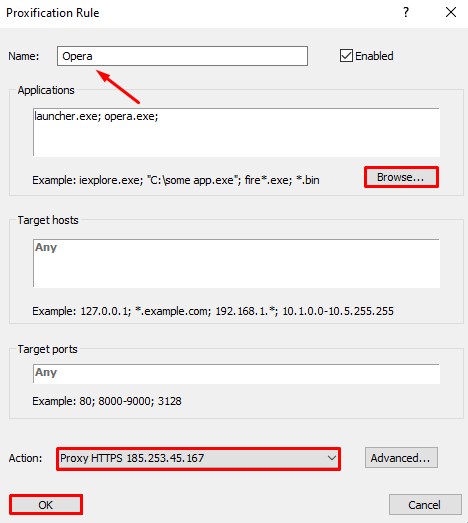
- In the new window, provide a name for the exception you wish to configure. It is often helpful to use the name of the program for which the exception is being created. Next, connect the program itself to the proxy by specifying the path to the executable file (ending in *.exe). Use the drop-down list below to select a specific proxy server for the rule. Once you have set the parameters, click the "OK" button to save the settings.
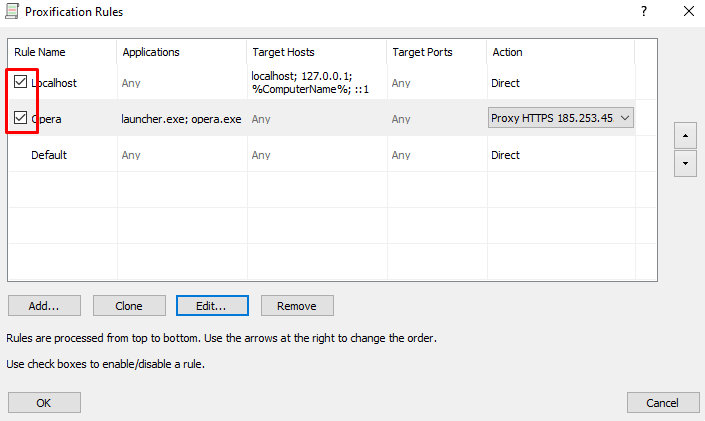
- With these settings, only the checked applications will be proxified, while the exceptions you've created will use the specified proxy server.

Proxy settings in Proxy Switcher
Proxy Switcher is a program specifically designed for the convenient management of proxy servers on a personal computer. Its primary purpose is to facilitate seamless switching between different proxy servers and configuration of their settings.
With Proxy Switcher, you gain the capability to effortlessly add, remove, and modify proxy servers within your list. This versatile program supports a wide range of proxy types, including HTTP, HTTPS, SOCKS4, and SOCKS5. Furthermore, you can configure specific parameters for each proxy server, such as the IP address, port, and authentication type.
One of the key features of Proxy Switcher is its automated proxy switching functionality. By establishing predefined rules, you can determine which proxies to utilize for particular websites, applications, or even designated time intervals. This flexibility empowers you to effectively manage proxy servers according to your specific requirements.
Moreover, the software offers a built-in capability to evaluate the performance of proxy servers, ensuring their proper functionality. Before integrating proxies into your workflow, you can conveniently assess their speed and stability through simple tests. This preemptive assessment helps in selecting proxies that meet your performance expectations.
How to use Proxy Switcher
Setting up Proxy Switcher is a straightforward process. Just follow the steps outlined below:
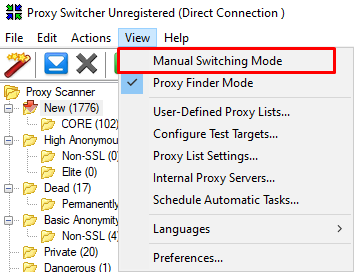
- Begin by running the application. By default, it will launch in automatic detection mode for public proxy servers. However, in this case, we don't require that mode. To switch to manual mode, navigate to the "View" section and move the toggle switch from "Proxy Finder Mode" to "Manual Switching Mode".
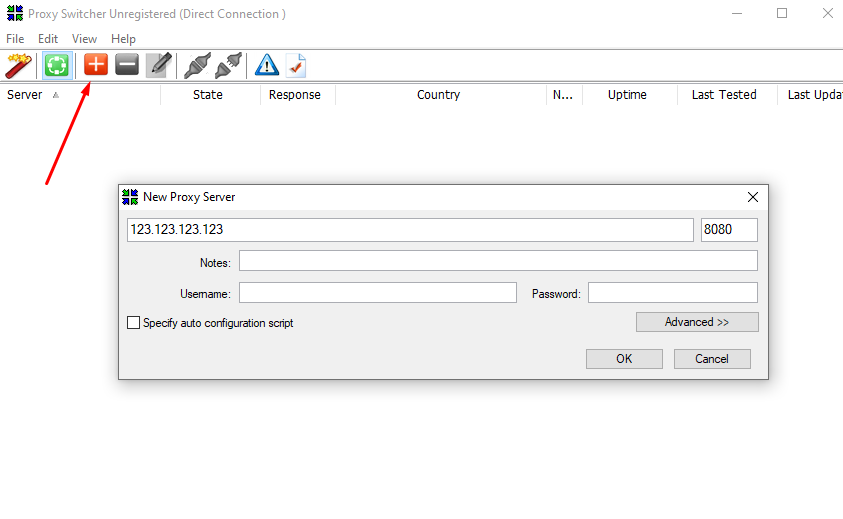
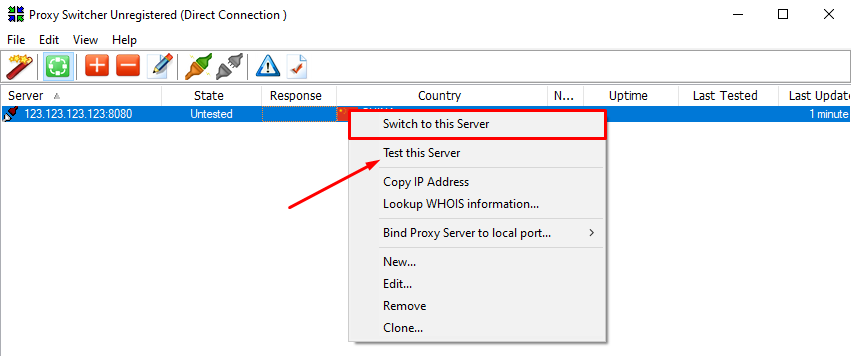
- To add a proxy server, click on the red "+" sign. Alternatively, you can right-click on an empty field and choose the "New" option. A window will appear where you can enter the proxy server's IP address, port number, login credentials, and password. If desired, you can also add a note in the "Notes" field.
- To select a previously added proxy server, right-click on it and select the "Switch to this Server" option. You can then proceed to test the server by selecting the "Test this Server" option.
Proxy settings in ProxyCap
ProxyCap is a powerful program designed to facilitate the use of proxy servers and enable the routing of network traffic through them. It offers the ability to configure proxies for different applications and games on your computer, enhancing your control over network connections.
The software boasts a user-friendly interface that is both simple and intuitive to navigate. Adding proxy servers and defining specific rules for them is a seamless process. You have the flexibility to configure proxies for individual applications or apply them system-wide.
ProxyCap supports various types of proxy servers, including HTTP/S, SOCKS4, and SOCKS5. You can conveniently specify the address and port of the proxy server while also setting up authentication measures, if necessary.
In addition, ProxyCap allows you to evaluate the performance of proxy servers by conducting connection tests. This enables you to ensure their reliability and suitability before integrating them into your network setup.
By providing convenient configuration options, ProxyCap empowers you to exercise full control over your network traffic, directing it through proxy servers. Whether you require anonymity, the ability to bypass restrictions, or the setup of proxies for diverse applications and games on your computer, ProxyCap serves as a valuable tool.
How to use ProxyCap
Below, we have provided step-by-step instructions on how to configure ProxyCap:
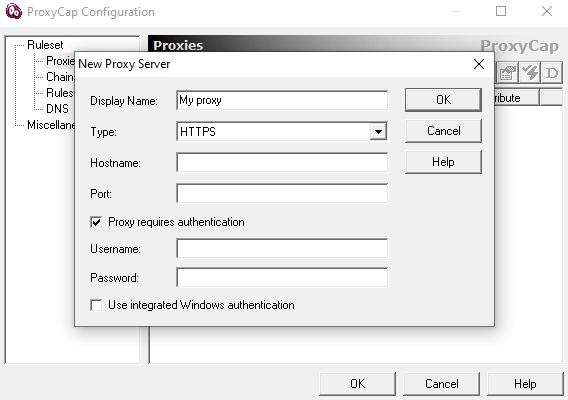
- Begin by launching the ProxyCap program. In the left part of the program window, navigate to the "Proxy" menu branch. From there, click on the "Add new" button located in the right part of the window.
- Provide a name for the new proxy, which can be the name of the application for which the proxy will be used for easy identification. Using the drop-down menu, select the appropriate type of connection protocol. Note down the IP address and port of the added proxy server. If you are using private proxies that require authentication, check the box next to the "Proxy requires authentication" option, and enter the corresponding login and password. Once these steps are complete, click "OK" to finalize the adding procedure.
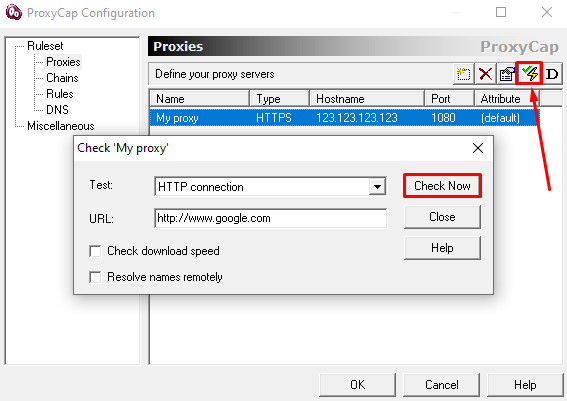
- To verify the functionality of the added proxy, click on the "Check" icon located in the upper right corner. This action will open an additional window where you can configure the scan parameters, such as the connection protocol type and a specific site to test.
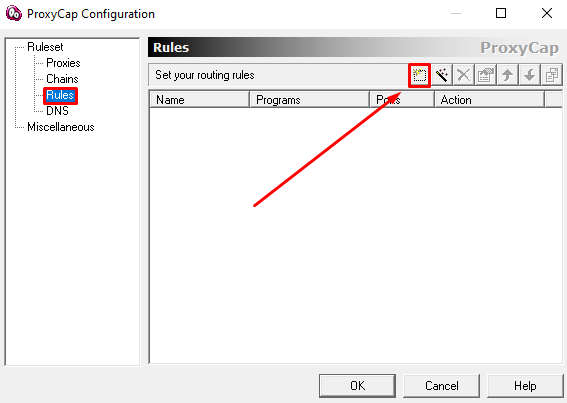
- To associate specific programs with particular proxy servers, go to the "Rules" section and click on "Create new" using the respective icon.
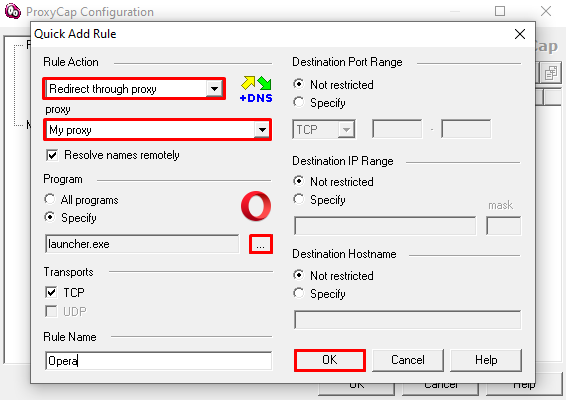
- In the rule creation window, select "Redirect through proxy" as the action from the first drop-down list. Then, choose a specific program by specifying the path to its executable file. You can do this by clicking on the button with three dots in a row. If desired, provide a name for the rule being created. Click "OK" to finalize the rule creation process.
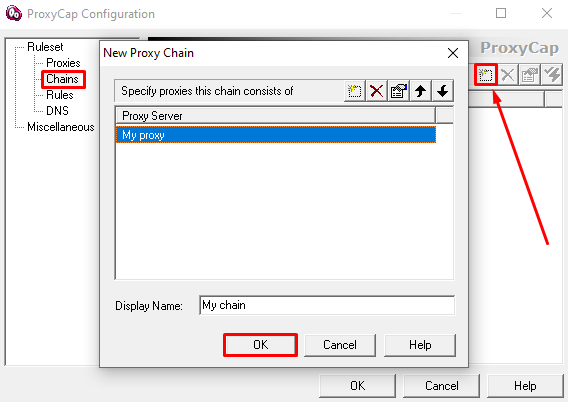
- If you wish to enhance your security level by creating a proxy chain, access the "Chains" option in the main menu. Click on the corresponding icon (number two in the screenshot) to add a new chain. Then, include the desired number of previously entered proxies into the chain. Finally, close the windows by clicking "OK".

By following these steps, you will have completed the basic configuration of ProxyCap.
Proxy settings in CCProxy
When it comes to selecting convenient proxy servers, many users often wonder about CCProxy. CCProxy is a proxy server program specifically designed to create and manage proxy servers on your computer. Its primary purpose is to enable internet access through a proxy server while offering monitoring and network traffic filtering capabilities.
CCProxy supports a wide range of connection protocols, including HTTP, HTTPS, FTP, SOCKS, SMTP, and POP3. It allows you to configure a proxy server for shared use within a local network, enabling multiple users to share the same internet connection.
The program features a user-friendly interface that is both simple and intuitive, making setup and management a breeze.
Additionally, CCProxy provides monitoring and logging functionalities for network traffic, enabling you to oversee user activities and identify any potentially unwanted behavior.
This software proves particularly useful for creating a local proxy server within your office or home network. It offers comprehensive internet access management, content filtering, and enhanced network security measures.
CCProxy configuration
The software's intuitive interface simplifies the setup process. Follow the steps below to configure it:
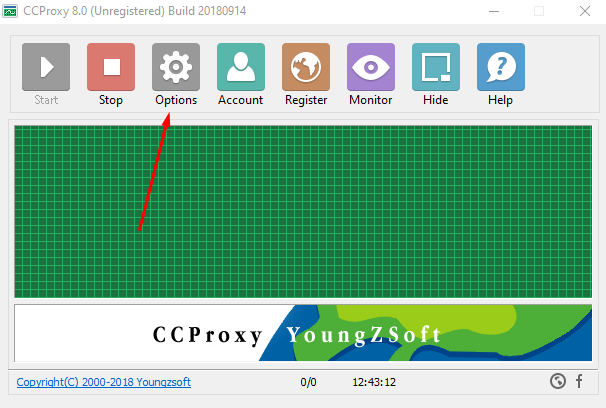
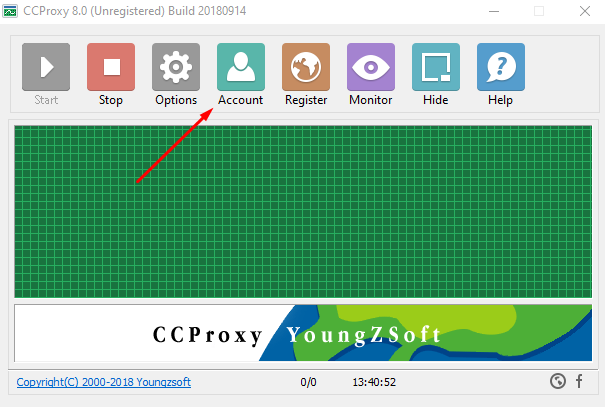
- Launch the CCProxy software on your personal computer and access its settings by clicking on the appropriate button.
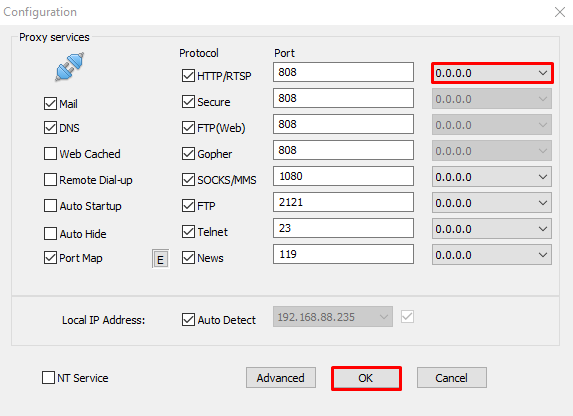
- Check the functions and protocols that you intend to use for connection. Make note of the port number associated with each selected function or protocol. Optionally, for your future proxy server, you can choose to use your real IP or leave it as zero. Save the changes by clicking the "Yes" button.
- To grant access to your proxy server for other computers on your local network, return to the main menu and click on the "Account" button.
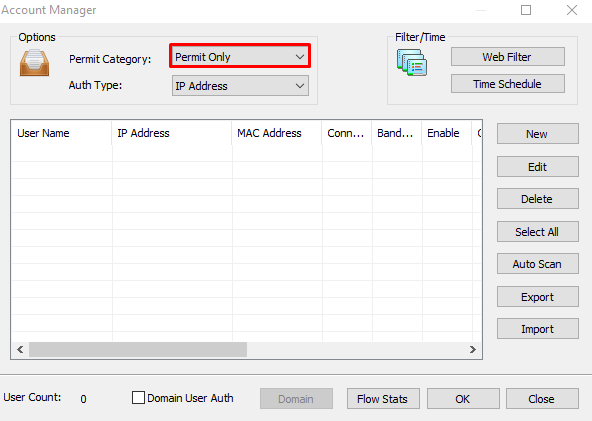
- By default, all devices on your local network have access to your proxy server. For enhanced security, change this setting to "Permit Only".
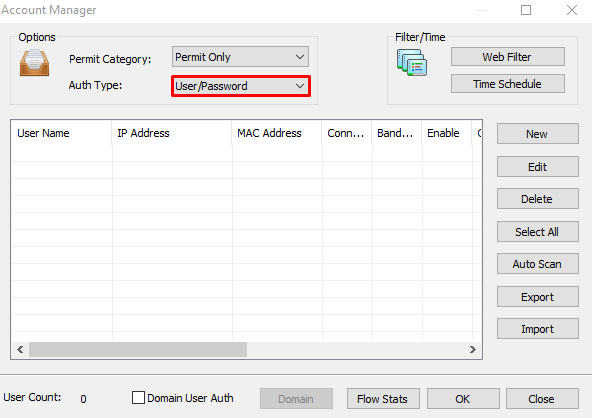
- From the drop-down list in the check field, select the desired type of authorization for computers connecting to your server.
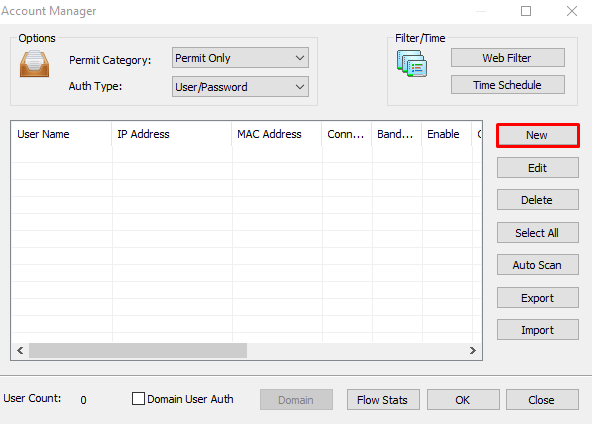
- Proceed to provide a new user with access by clicking on the "New" button.
- In the parameter window, configure the settings according to your requirements, such as specifying a user or group name, authorization by IP, password, or MAC address. The indicators marked as -1 next to the parameters "Connection no more", "Width of the download channel", and "Width of the upload channel" indicate that no restrictions are currently in place. Save the changes by clicking the corresponding button and then click "OK".

By following these steps, you can create your own proxy server using CCProxy and grant access to the required number of users from your local network, enabling them to access the internet.
Proxy settings in FreeCap
FreeCap is a powerful program designed to facilitate the proxying of network applications on your computer. It grants you the capability to redirect application traffic through proxy servers, enabling enhanced control over network connections.
Operating at the operating system level, FreeCap intercepts network traffic between applications and the Internet. This allows you to configure proxies for specific applications or apply them system-wide.
The software supports various types of proxy servers, including HTTP, HTTPS, SOCKS4, and SOCKS5. You have the flexibility to add and configure multiple proxies, and then selectively assign them to specific applications.
FreeCap provides a range of flexible settings, allowing you to manage traffic redirection rules effectively. Additionally, you can set up filters to further refine the proxying process.
Some additional benefits of FreeCap include an intuitive interface, which simplifies the user experience, and the availability of open-source code, providing transparency and the potential for customization.
Overall, FreeCap empowers users with powerful proxying capabilities, offering flexibility, control, and ease of use through its intuitive interface and open-source nature.
How to use FreeCap
Setting up FreeCap is a straightforward process that can be easily performed by any user. Follow the steps below:
- Launch the FreeCap application and navigate to the main menu. Click on "File" and select the "Settings" sub-item.
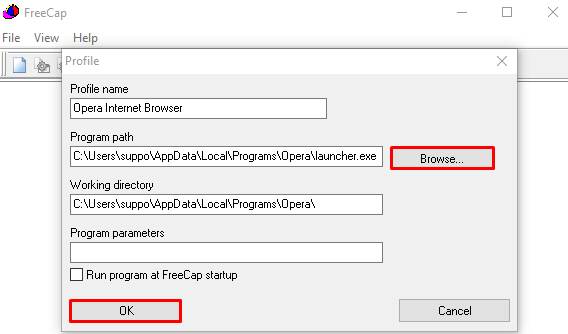
- Add the program that you want to use with the proxy. Provide a profile name and specify the path to the program by clicking the "Browse" button. If you want the proxy settings to be applied automatically every time FreeCap starts, check the box next to "Run program when FreeCap starts".
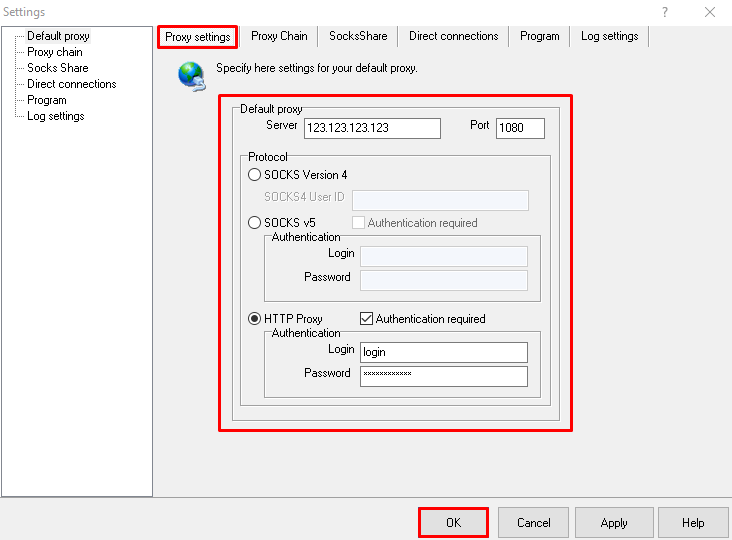
- Now, it's time to add the proxy server parameters. Return to the "Settings" menu by selecting "File" ⇨ "Settings" again. In the "Settings" menu branch, choose "Proxy settings" and go to the "Proxy settings" tab. Specify the desired connection protocol, enter the IP address and port of the proxy server. If authentication is required, provide your username and password. Apply the changes by clicking the "Apply" and "OK" buttons.
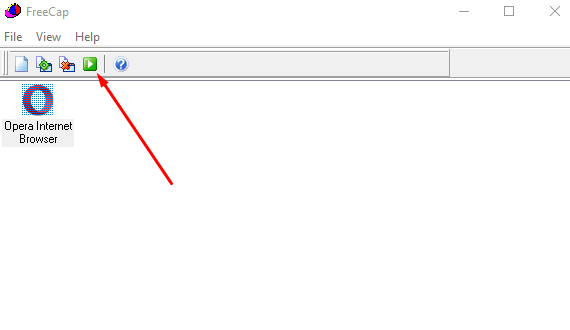
- Finally, bind the added proxy to the specific program you want to use it with. Simply left-click on the application in FreeCap and click on the "Run" icon.

Now, after completing the above steps, your Google Chrome browser (or the chosen program) will utilize the specified proxy server when accessing the network
What program to choose to configure the proxy
When it comes to choosing a proxy configuration program, it's important to consider your specific needs and preferences. Here is a brief overview of each program listed to help you make an informed decision:
- Proxifier: This advanced program supports various types of proxies and allows you to proxy network applications that don't natively support proxies. It offers a wide range of functions and flexible settings, making it ideal for professionals and advanced users.
- Proxy Switcher: This program provides convenient options for managing proxy servers. It allows for easy switching between different proxy servers and features a user-friendly interface. It supports various proxy types and includes additional features like automatic proxy detection. It is a good choice for users who frequently switch between proxy servers.
- ProxyCap: A popular program for setting up proxy servers, ProxyCap enables the redirection of traffic from specific applications through proxies. It offers flexible settings for redirection rules and supports various proxy types. ProxyCap's user-friendly interface makes it suitable for users who require tailored proxy configuration for specific applications.
- CCProxy: CCProxy is primarily used for creating and managing your own proxy server. It simplifies the installation and configuration of a proxy server on your computer or local network. It includes authentication, filtering, and access control features, making it useful for organizing proxy servers in a corporate environment.
- FreeCap: FreeCap is an open-source proxification software. However, it hasn't been updated for a long time and may have limitations on newer operating systems or modern network protocols. If you require a simple program for basic proxy settings, FreeCap could be an option.
Ultimately, the choice of program depends on your specific requirements, preferences, and level of expertise. It is recommended that you explore the functionalities of each program yourself to determine which one best aligns with your needs..
No comments