Proxy settings in Top 10 anti-detect browsers
How to set up a proxy in Tor
How to use AntBrowser with proxy
Proxy settings in Kameleo
Indigo Browser proxy setup
Ghost Browser with proxies
Proxy settings in Multilogin
Gologin: Proxy integration
Proxy settings in AdsPower Browser
Proxy settings in Dolphin Anty
Proxy settings in Octo Browser
Proxies designed for anti-detect browsers offer numerous benefits, significantly enhancing anonymity and protecting personal data while using such browsers. Here are some advantages they provide:
- Concealing Real IP Address: These proxies allow you to hide your actual IP address and replace it with the IP address of the proxy server. This boosts your online anonymity, making it more challenging to trace your online activities. It also helps bypass regional restrictions and content blocking.
- Access to Restricted Content: By utilizing proxies from different countries, you can access content that may be restricted or unavailable in your own region. This allows you to bypass geolocation-based restrictions and enjoy a broader range of online content.
- Data Encryption: Proxies for anti-detect browsers provide data encryption between your device and the server, bolstering your privacy and preventing interception of sensitive information. Encryption ensures that your data remains secure and private while in transit.
- Multiple Browser Profiles: These proxies enable the creation and management of multiple browser profiles, each with its own unique IP address. This feature proves useful for testing, automation, and managing multiple accounts simultaneously.
- Load Distribution and Performance Improvement: By distributing the load across different IP addresses, proxies help improve performance and reduce the risk of being blocked when conducting a high volume of requests. This load distribution ensures smoother browsing experiences and enhanced efficiency.
In the subsequent sections, we will guide you on how to configure the use of proxy servers in the top 10 anti-detect browsers. These configurations will help improve anonymity, bypass blocking, enhance security, and increase browsing efficiency on the web.
How to set up a proxy in Tor
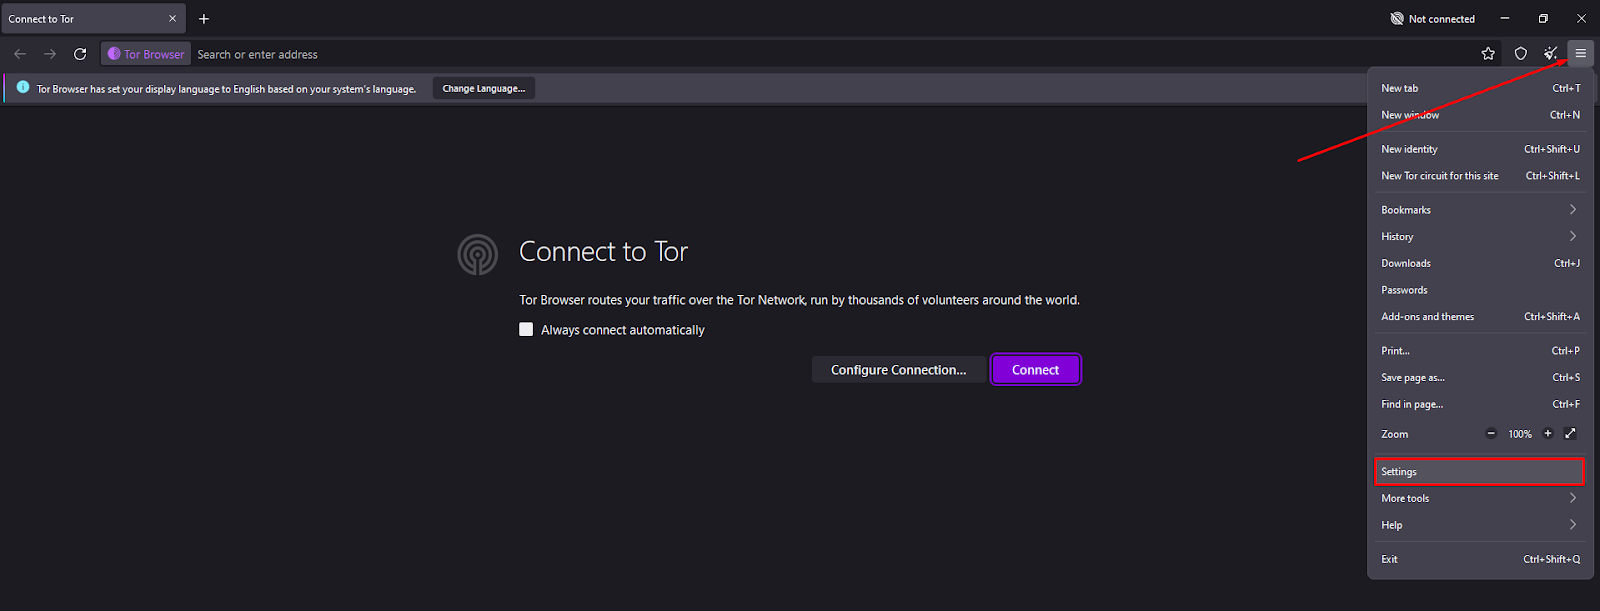
- Launch Tor Browser and open the main menu by clicking on the icon in the form of three horizontal lines located in the upper right corner of the window. Then, select the "Settings" menu item.
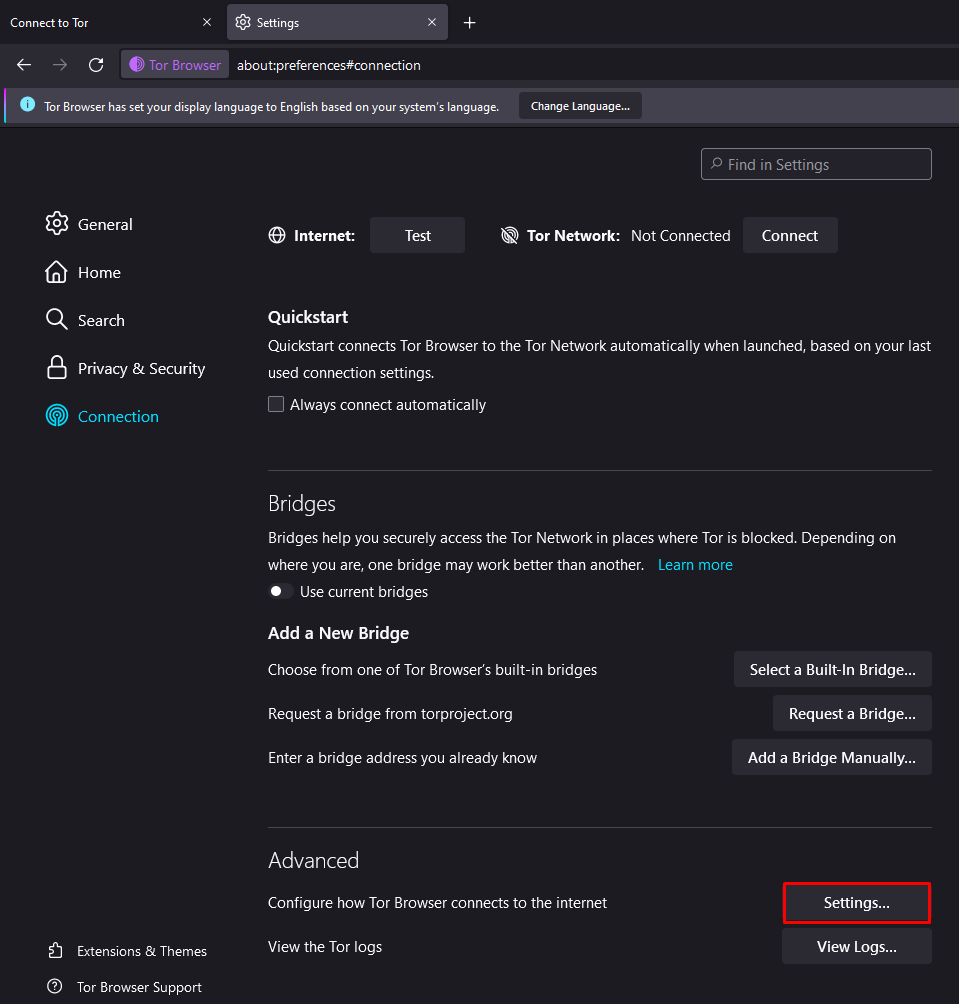
- In the left part of the browser window, you will find the main settings menu. Select the "Connection" item.
- Scroll down the settings page to the bottom, where you will find the "Advanced" section. Click on the "Settings" button next to the "Setting Tor Browser Internet Connection" option to manually configure proxy settings.
- An additional settings window specific to Tor Browser will open. Check the box next to "I use a proxy to connect to the Internet" and enter the details of your proxy server. Choose the appropriate type of connection protocol (SOCKS4, SOCKS5, HTTP/HTTPS) from the drop-down list, and provide the IP address and port in the respective fields. If your proxy server requires authentication, enter the login and password in the provided fields. Once done, click the OK button to save the settings and restart the connection of the Tor browser to the network.


With these configurations, your proxy setup in Tor Browser is complete, and you can now use Tor Browser anonymously by leveraging private proxy servers.
How to use AntBrowser with proxy
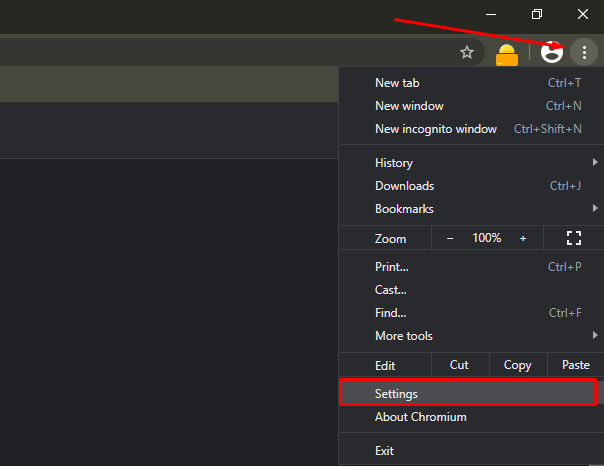
- Launch AntBrowser and open the browser menu located in the upper right corner. Then, select "Settings".
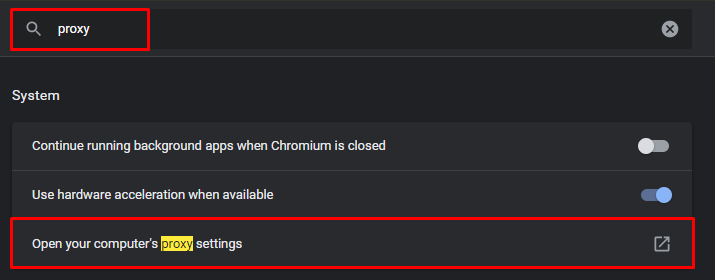
- In the settings window, type "Proxy" in the search bar. When the relevant settings section appears, click on the "Configure" button.
- Choose "Manual proxy service configuration" and enter the IP address and port of your proxy server in the respective fields. Select the appropriate type of connection protocol (HTTP, SSL, FTP, SOCKS4, SOCKS5) based on your proxy server's configuration.
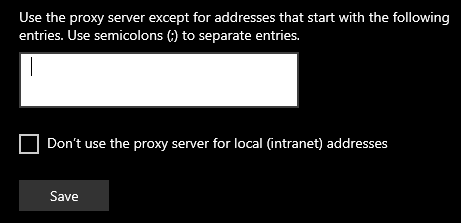
- If you wish to restrict the usage of the proxy server to specific addresses, you can specify them in the designated box below.
- To save the settings and complete the configuration, click on the "OK" button.

Proxy settings in Kameleo
To surf anonymously through the Kameleo browser using a proxy server, please follow the step-by-step instructions below:
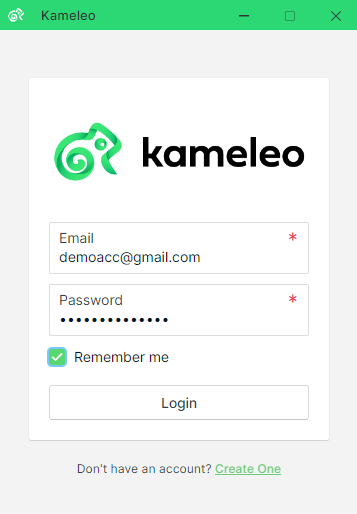
- Launch the Kameleo anti-detect browser and log in with your credentials.
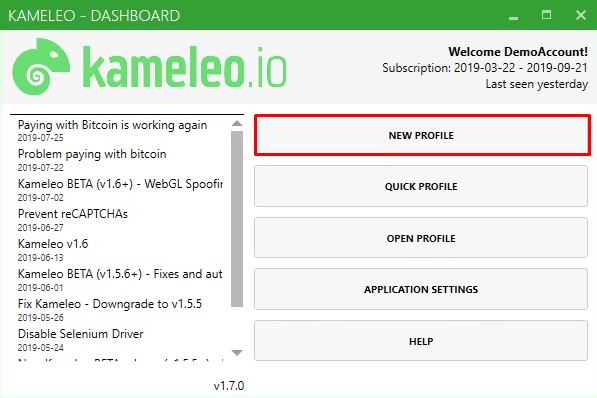
- Create a new profile for your desired settings by clicking the "New Profile" button.
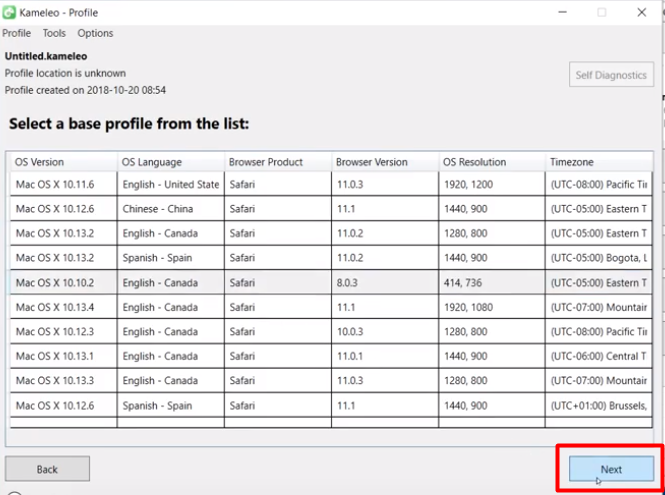
- Connect a compatible standard browser, such as Safari, to Kameleo. To do this, select the browser from the drop-down list and click the "Search" button.
- Once connected, you will have a wide range of options available. Choose a proxy with the desired geolocation that suits your needs.
- Specify the desired time zone for your browsing activities and click the "Next" button.
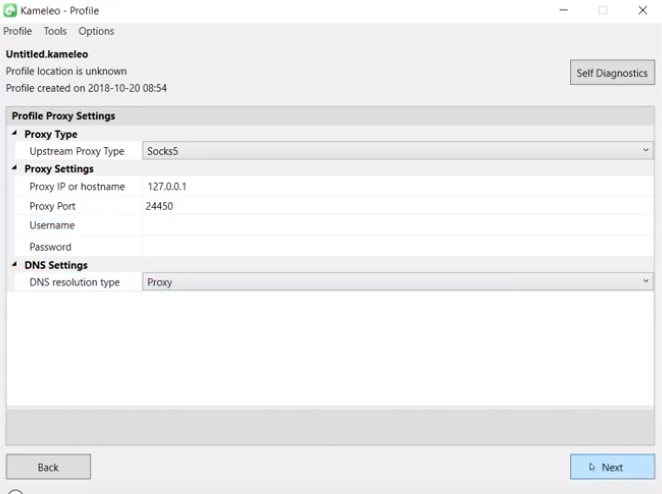
- Select the appropriate proxy server connection protocol from the drop-down list.
- Take note of the proxy server parameters provided. Additionally, ensure that the "Proxy" option is selected next to the "DNS resolution type" field. Proceed with the settings by clicking the "Next" button.
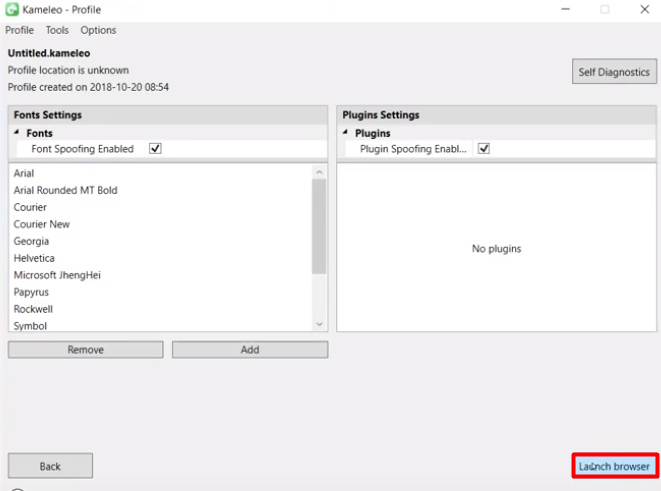
- Finally, click the "Launch Browser" button to initiate the selected browser with the configured settings and start browsing the internet anonymously.


The setup is now complete. For the highest level of anonymity, it is recommended to use a separate proxy for each individual profile within Kameleo.
Indigo Browser
Indigo Browser is a privacy-focused web browser that prioritizes user privacy and security while browsing the internet. It encompasses a broad array of features dedicated to enhancing anonymity and safeguarding your online activities.
Benefits of using a proxy in Indigo Browser
Indigo Browser is a dependable tool for ensuring secure Internet browsing. However, it's important to note that achieving absolute anonymity requires the use of proxy servers. Proxy servers enable users to navigate websites, communicate, and carry out professional tasks without leaving any traces on the network. These servers are particularly beneficial in situations involving traffic arbitration, SMM promotion, data parsing, and process automation.
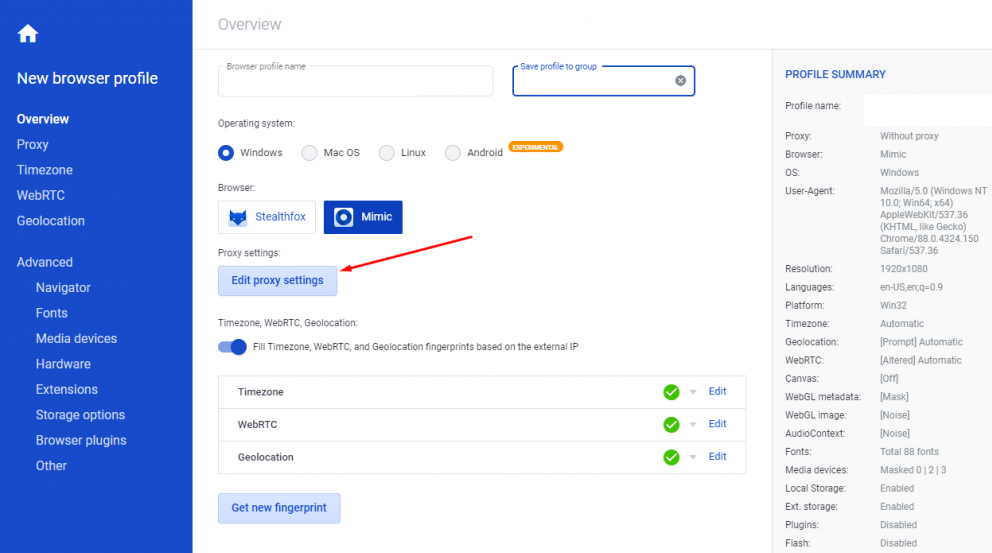
Proxy settings in Indigo Browser
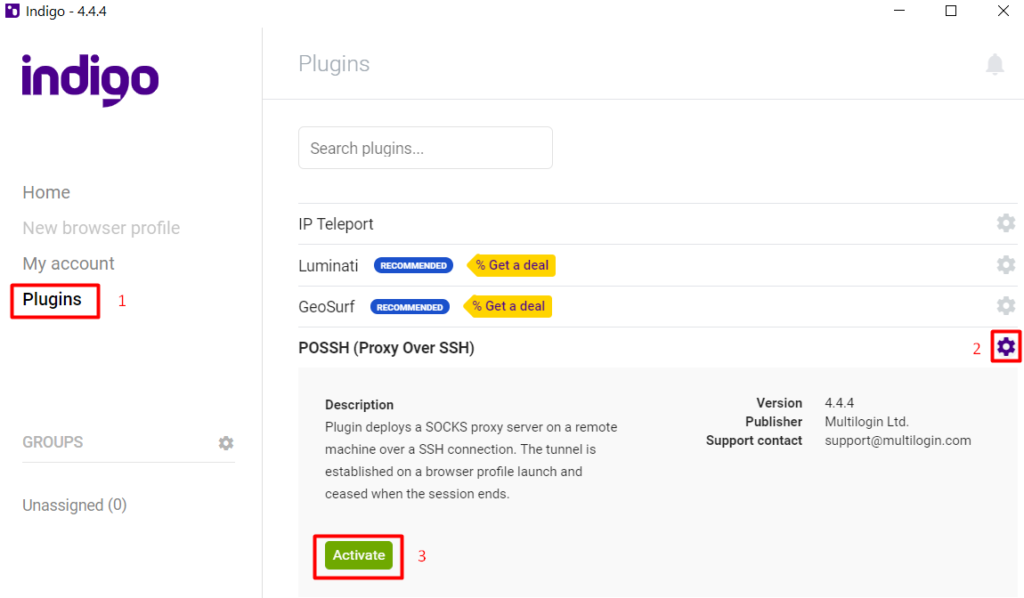
To utilize proxy servers in the Indigo browser, you can employ the "POSSH (Proxy Over SSH)" plugin by following these steps:
- Begin by opening the browser's main menu and navigating to the "Plugins" section. Locate the "POSSH (Proxy Over SSH)" plugin within the list of available plugins. To access its settings, click on the gear icon situated to the right of the "POSSH" plugin. From the menu that appears, select the "Activate" option to enable the plugin. If the "POSSH" plugin is already active by default, you can proceed to the next step.
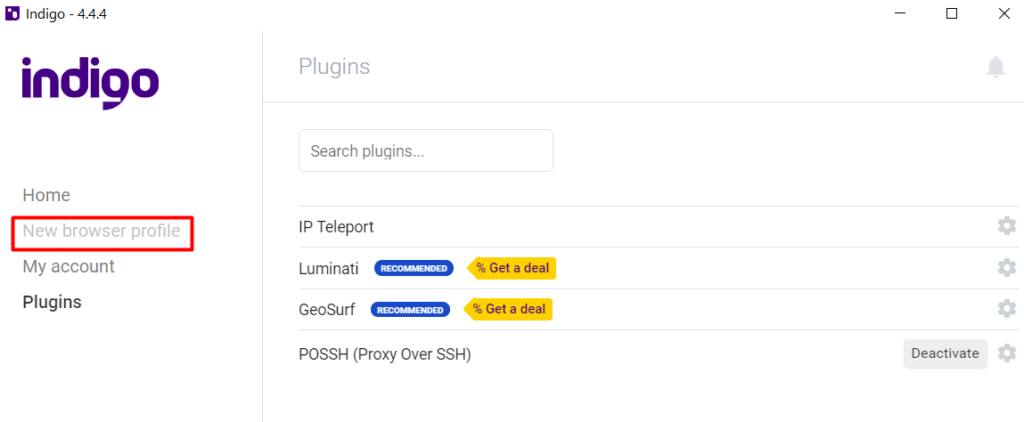
- Next, create a new browser profile by opening the "New browser profile" section in the program's main menu. Look for and select the option labeled "Create new profile" or "New profile".
- Provide a name for the new profile or choose from the available options.
- If needed, customize the profile settings according to your requirements. Once done, click the "Create" or "Save" button to finalize the creation of the new browser profile.
- In the "Operation system" section, select the appropriate operating system from the suggested options, such as Windows, Linux, or Mac OS. Locate the "Edit" button adjacent to the "Operation system" section and click on it. From the provided list, choose the operating system that matches yours. After selecting the operating system, click the "Save" button to save the changes.
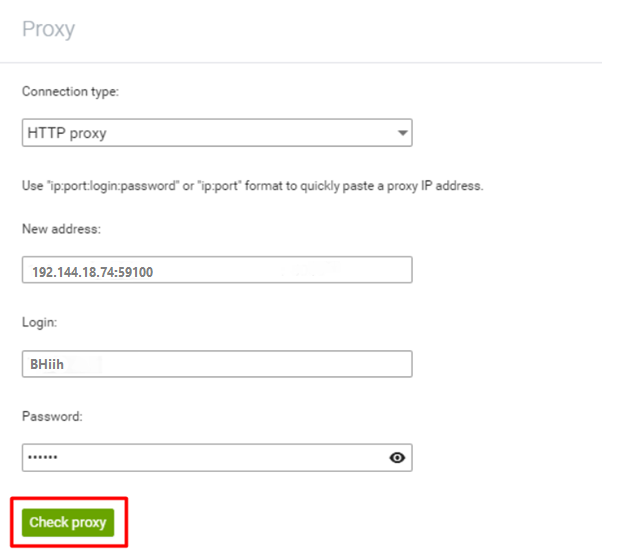
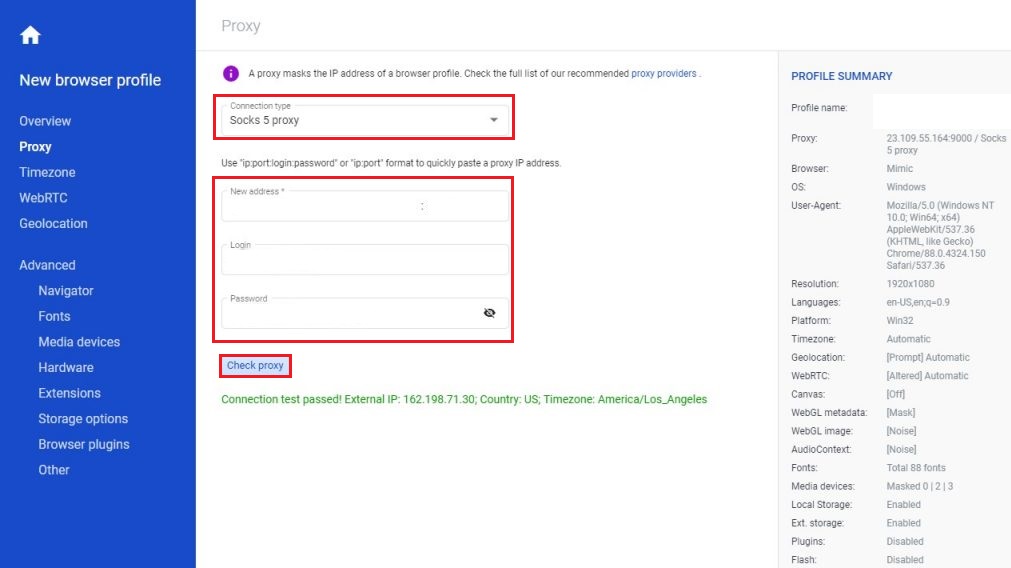
- To specify the details of your proxy server, access the "Edit proxy settings" tab. Fill in the necessary information, including the protocol, IP address, port, login, and password (if required). Once you have entered the data, click the "Check proxy" button to verify the functionality of the designated proxy server.


Ghost Browser with proxies
Proxies in Ghost Browser provide the following features:
- anonymity;
- managing multiple accounts;
- blocking bypass;
- testing and development;
- safety.
How to set up a proxy in Ghost Browser
There are two options for setting up a proxy in Ghost Browser. For the entire browser and for each tab individually.
For the whole browser
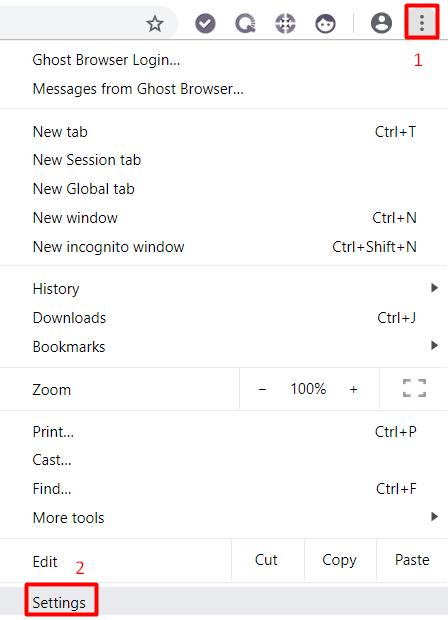
- Once you have launched Ghost, access the settings by clicking on the icon represented by three vertical dots located in the upper right corner of the window. From the dropdown menu, select the "Settings" option.
- In the center of the settings window, utilize the search bar to enter the term "Proxy". Locate the search result labeled "Open proxy settings" and click on the arrow icon pointing to the right next to it.
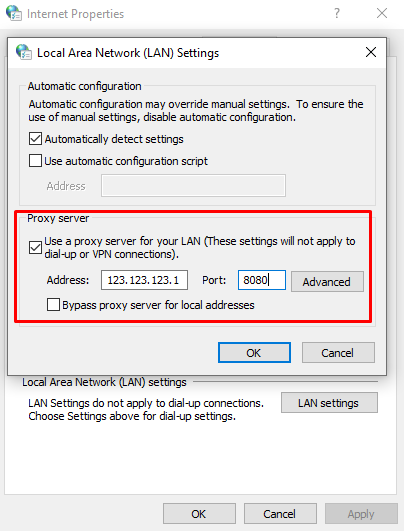
- The browser will automatically redirect you to the Internet properties system settings. Within the system settings, navigate to the "Connections" tab and click on the "Network settings" button. This will open the settings for the local network configuration.
- Check the box next to "Use a proxy server for local connections". Then, input the proxy settings, including the proxy address and port, in the fields provided below. Click the OK button to save the settings.
- In some cases, the system may require you to specify a specific protocol for the proxy server connection. If prompted, click on the "Advanced" button located next to the port input field. In the subsequent window, check the box next to "One proxy server for all protocols". Remember to save the changes by clicking on the "OK" buttons.


Proxy settings in Ghost Browser for each tab individually
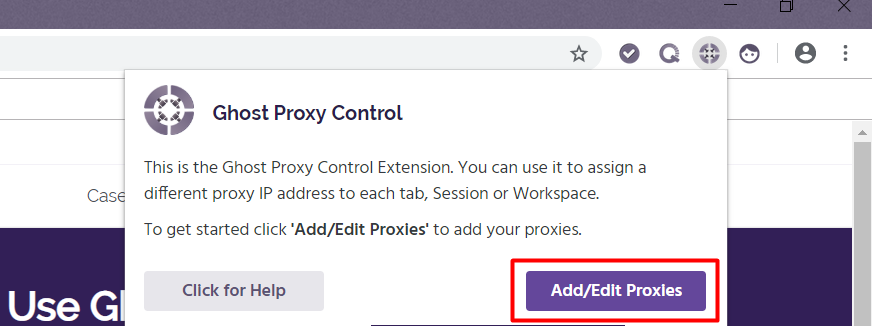
- Locate the "Ghost Proxy Control" icon near the address bar. It resembles an aiming mark. Click on the icon, and then select the "Add/Edit Proxies" button.
- In the "Add Bulk Proxies" tab, proceed to export the proxy list by clicking on the "Export Proxy List" button.
- Open the downloaded Proxy-list.csv file and input the proxy server settings according to the specified format.
- After adding the desired number of proxy servers to the CSV file, import it back into the browser. To do this, click on the "Import Proxy List" button within the Ghost Proxy Control extension and provide the path to the file.


By following these steps, you can add proxies to each individual tab using the Ghost Proxy Control extension.
Proxy settings in Multilogin
- Begin by creating a new profile.
- Once you have created the profile, locate the "Proxy" menu item on the left side of the browser window. Click on it to access the proxy server settings. This will open the settings page.
- On the settings page, you will find several fields. Use the drop-down list to select the desired connection protocol, such as http/s, Socks4, or Socks5. Below that, enter the proxy IP address and port. If authentication is required, provide your login and password in the respective fields. Finally, click on the "Check proxy" button to verify the proxy settings.
- If the proxies pass the check successfully, close the proxy settings page and you can now utilize them for your intended purposes.

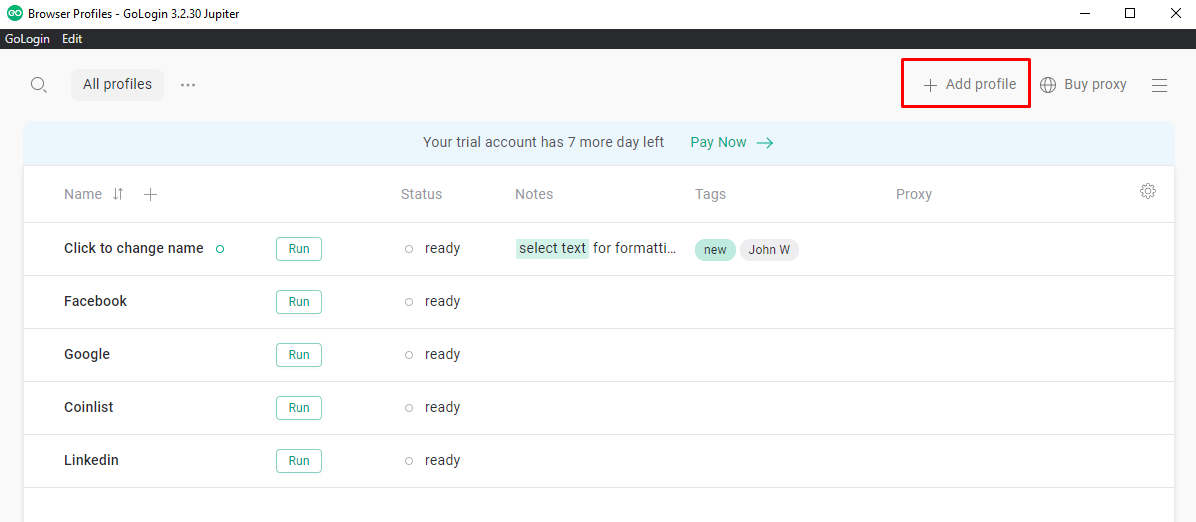
Gologin: Proxy integration
Setting up a proxy in Gologin is a straightforward process. Here's how you can do it:
- Click on the "NewProfile" menu item located at the top of the browser window to create a new profile.
- Navigate to the "Proxy" tab within the settings. In this tab, use the drop-down list to select the appropriate connection protocol. Enter the relevant parameters for the added proxy server, including the IP address and port. If authentication is required, provide the login credentials and password. Make sure to click on the "Check Proxy" button to verify the functionality of the proxy. If the check is successful, save the settings and you're ready to start using the proxy for your tasks.

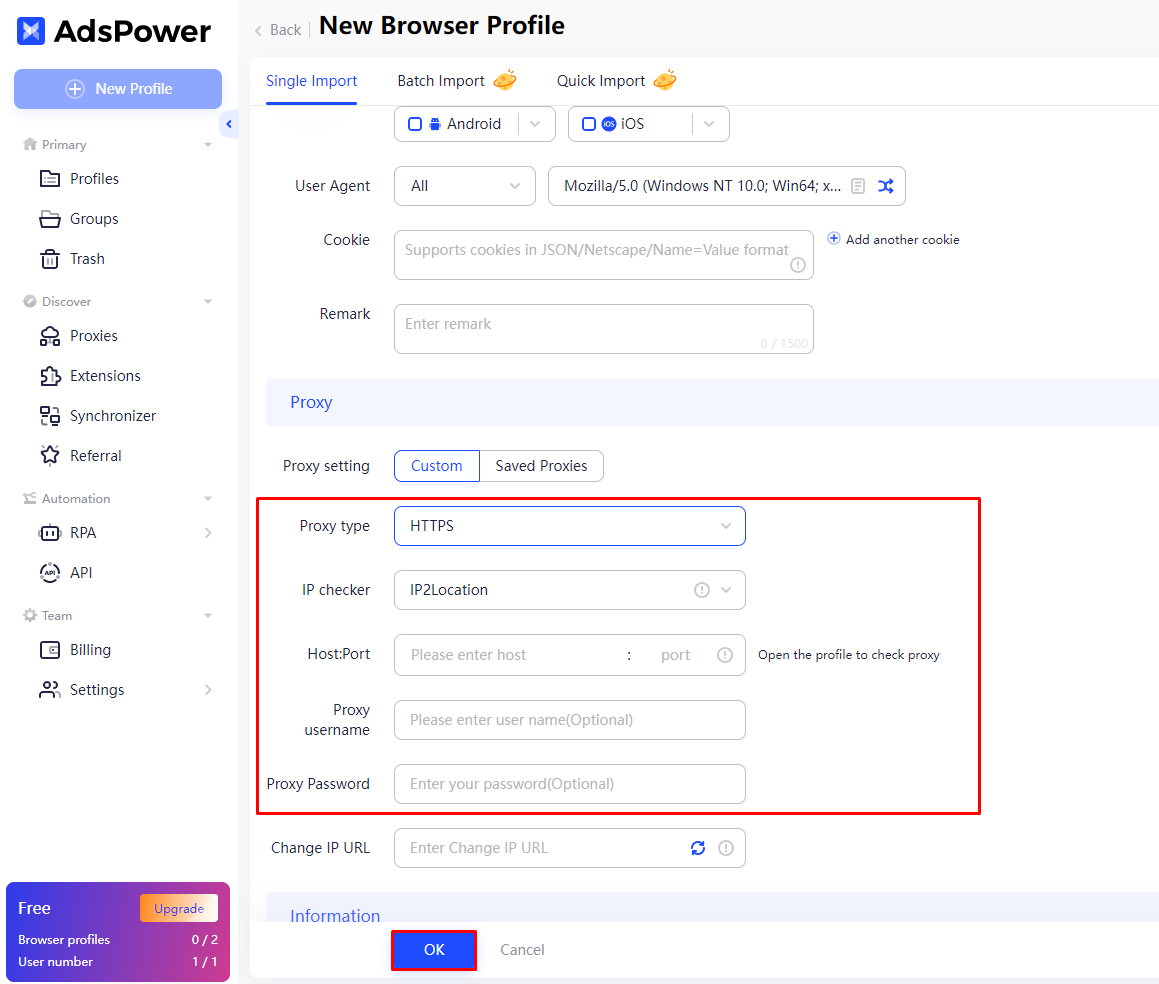
Proxy settings in AdsPower Browser
Setting up a proxy in AdsPower's intuitive browser interface is a straightforward process. Here's a step-by-step guide:
- From the main menu on the left side, select "Proxy".
- In the "Proxy" window, locate and click on the "Add proxy" button.
- In the provided empty field, enter the proxy parameters. Specify each new proxy address on a separate line. Ensure to check the operability of the proxies.
- After checking the proxies, click on the "OK" button to confirm and save the settings.
- To utilize the added proxies, navigate to the profile you created. Click on the "Saved proxies" button and choose the desired proxy from the drop-down list.


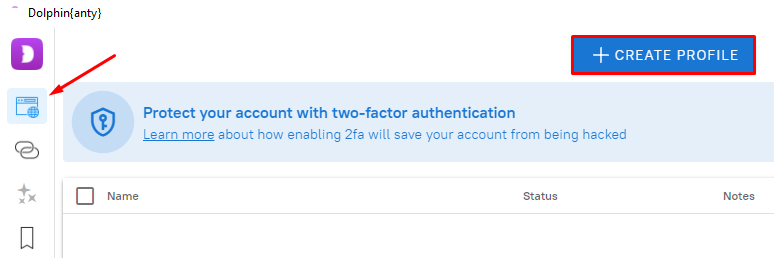
Proxy settings in Dolphin Anty
Dolphin Anty provides an intuitive interface that enables all users to access proxy settings easily. Here's how to set up proxy settings in Dolphin Anty:
- Utilize the vertical menu located on the left side of the browser window and navigate to the "Proxy" section.
- Click on the "+" icon at the top of the window to add proxy settings.
- In the field on the right, enter the parameters of the proxy server you wish to add. Specify the IP address, port, login, and password (if required), separated by a colon. Once entered, click on the "ADD" button located in the upper right corner.
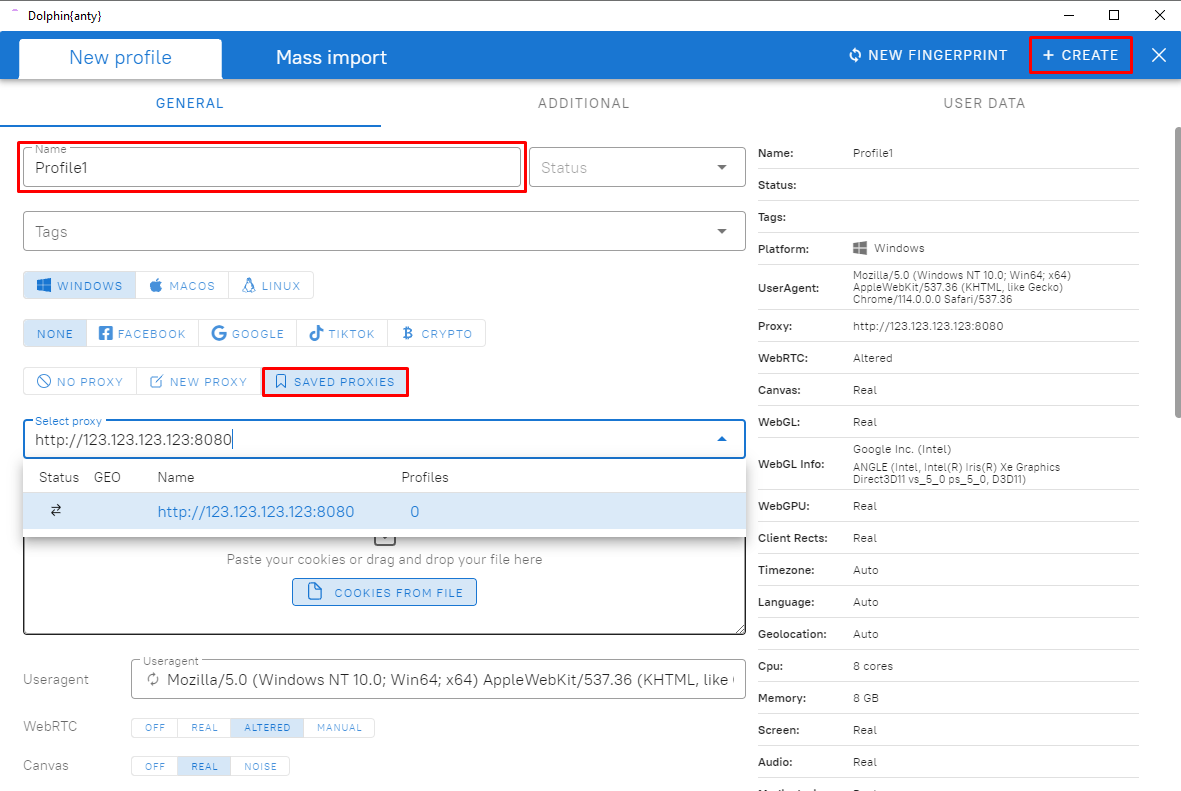
- Return to the main menu and create a new profile.
- Within the proxy settings block, click on the "Select proxy" tab. Choose the appropriate proxy from the drop-down list to associate it with the current profile. Additionally, in this section of the settings, you have the option to add a new proxy server or disable the use of proxy altogether.
- Click on “Start” in the “Browsers” tab opposite the created profile to start working.


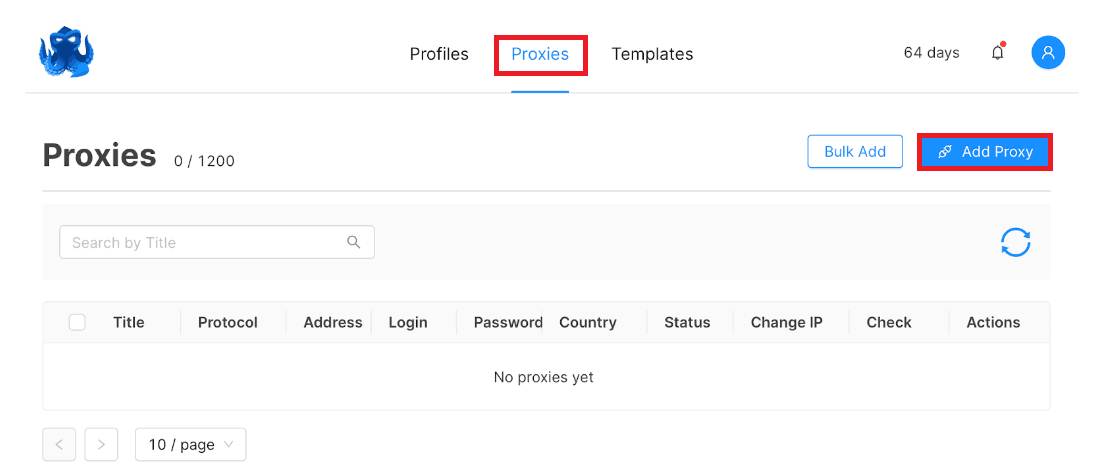
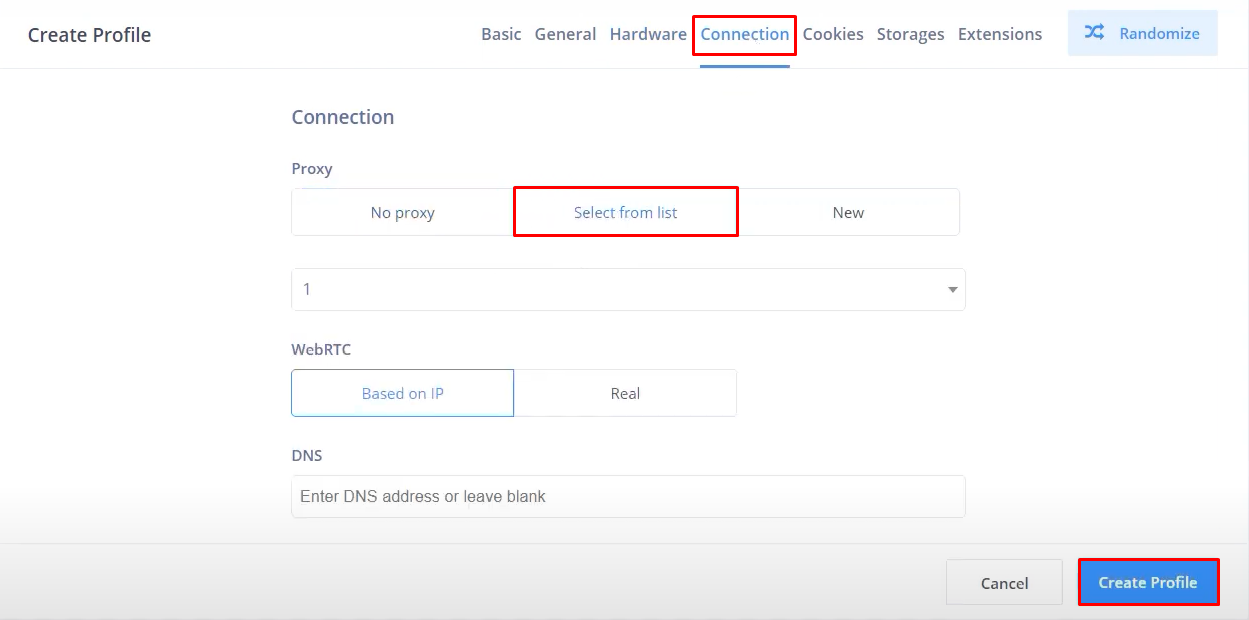
Proxy settings in Octo Browser
Setting up a proxy in Octo Browser is a straightforward process. Just follow these steps:
- Use the main menu at the top of the browser and navigate to the "Proxies" section. Click on the "AddProxy" button to add proxies.
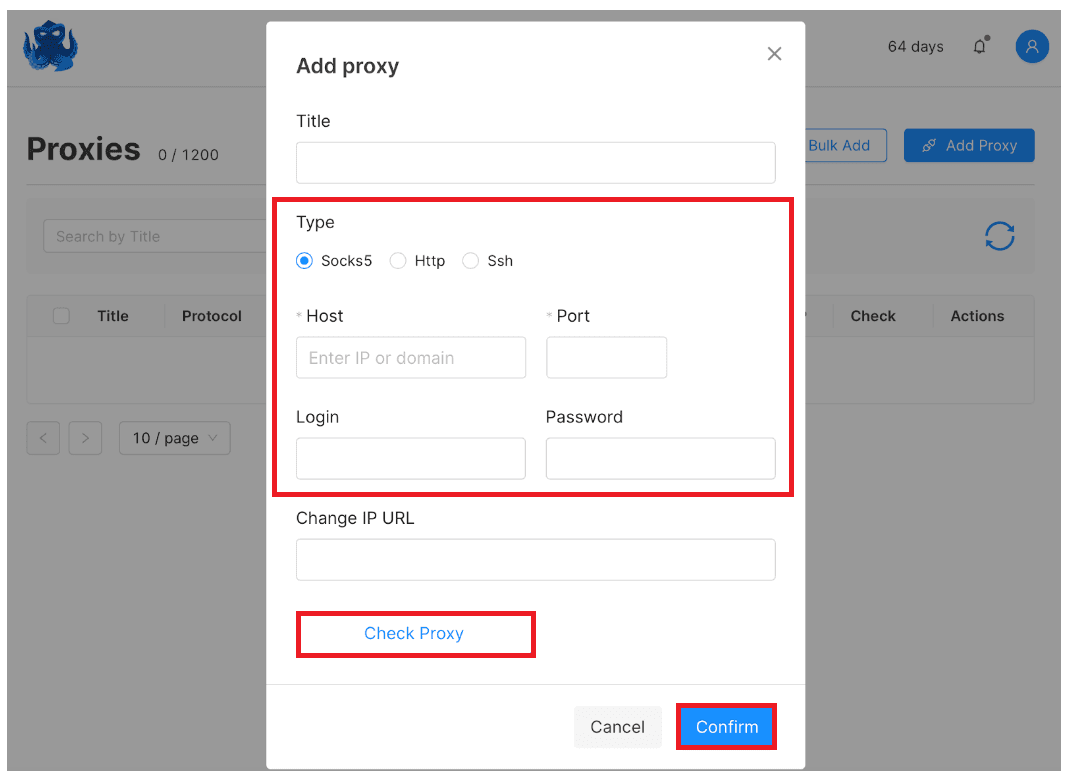
- Select the type of connection protocol (Socks5, http, SSH), and enter the host parameters, including the IP address and port. If authorization is required for the proxy server, provide the login and password in the respective fields. Verify the added proxy server by clicking on "Check Proxy", and if the check is successful, click "Confirm".
- Create a new profile to which you will associate the proxy. Click on the "Create Profile" button located in the upper right corner of the browser.
- In the profile settings, navigate to the "Connection" tab. Click on the "Select from list" button and choose the previously added proxy server from the drop-down list. Complete the process by clicking the "Create Profile" button.
- In the profile settings, you also have the option to add a new proxy server. Click on the "New" button and provide the proxy parameters in the fields as described in step 2.

No comments